Next: Taking Measurements
Up: Aquisition Software Development.
Previous: Aquisition Software Development.
Index
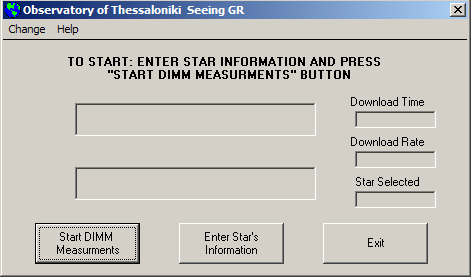
The program's interface is quite simple, so even a person with no astronomical knowledge can use it. It has three (3) buttons.
- The "Start DIMM Measurements" button
This is the main button of the program .With this one we can take DIMM measurements by just pressing it!!
- The "Star's Information" button
With this one we enter the star's information, meaning the star's name and coordinates. You can't take measurements if you don't enter any information about the star you are observing.
- The "Exit" button
By pressing this one you quit the program!!
Figure 4.1:
The Program's Interface.
|
|
The main body of the program also contains a number of boxes. There are two information boxes, used to display varius information, a box with the download rate, a box with the download time and a box that contains the star that you have selected with the "Star Information" button.
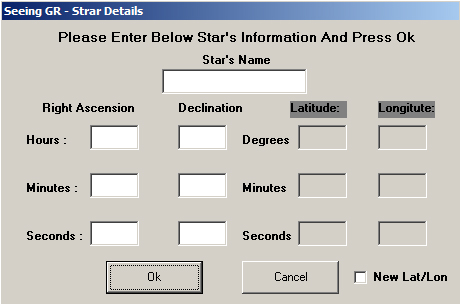
Figure 4.2:
The Star Details Interface.
|
|
In figure 4.2 it is shown the Star details interface. Here you must enter at least the name of the star you are going to observe. If no coordinates entered then this name will be used to find the  and
and  from the official catalogs. Of course you are encouraged for you to enter the celestial coordinates since this will greatly simplify the reduction procces.
Apart from the information concerning the star, there is a button called "New Lat/Lon". This button is ment to be used only if you are observing in a location other than your home location. Your home location is the place you specified in the registracion form. So if you are going to observe in different place please enter here the coordinates. If you don't know them or you can't find them please enter in all fields "00" and when you will send us the data please attach a file or send us an e-mail giving us detailed information about the place you observed (eg. 20Km south of Lamia, near the village Krania...) so we will be able to find them.
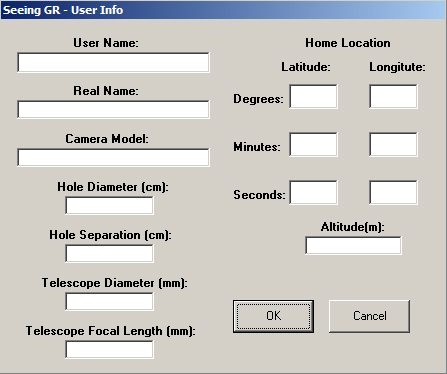
Figure 4.3:
The User Info Dialog.
|
|
In figure 4.3 it is shown the User information dialog. This dialog appears when you run the program for the very first time. Here you must enter the same information as those in the registrasion form. Please have in mind that a cross-check of these information is run automaticaly. If information entered in the "User info Dialog" are different from those in the registration form then the data will not be analysed and you will be contacted to sort this out.
The user inforamtion dialog can be also accesed from the menu "Change". Please change this information only if it is nececery to do so. Also if you change them please inform us with an e-mail. Remember that such changes must not be frequent!!!
Next: Taking Measurements
Up: Aquisition Software Development.
Previous: Aquisition Software Development.
Index